
Malware. Scam. Spear phishing. Brute force cracking of passwords.
In times of increasingly frequent, sophisticated and intense cyber attacks – including attacks on control systems – it is necessary to increase the level of security of these systems. Today we will show how to set encryption of all network communication between the D2000 Server and all network clients - whether it is the user interface (HI), configuration tools (CNF, GR) or remote system processes (Kom, Archive, DbManager, Event etc.).
The first good news is that encryption is provided by the TLS (Transport Layer Security) security protocol, specifically the OpenSSL implementation. The same protocol is used to secure encrypted HTTPS communication, which you use to work with your bank account in the browser. D2000 versions 21 and 22 use the latest version of this protocol, TLS 1.3.
The second good news is that enabling TLS is possible without restarting the application. The necessary parameters are stored in the registry (or on Linux in the configuration file of the application) and the D2000 Kernel reads them every time the client connects.
So - how to do it? Basically according to the instructions in our documentation.
To secure communication, we need to generate an encryption key and certificate and configure the D2000 Kernel to use it. Next, we need to distribute the certificate to clients and tell them to use it.
Generating Private Key and Certificate for D2000 Kernel
You should perform the following operations on a trusted computer - for example, on your work machine. It is not necessary to do them on the server where the D2000 application server is running.
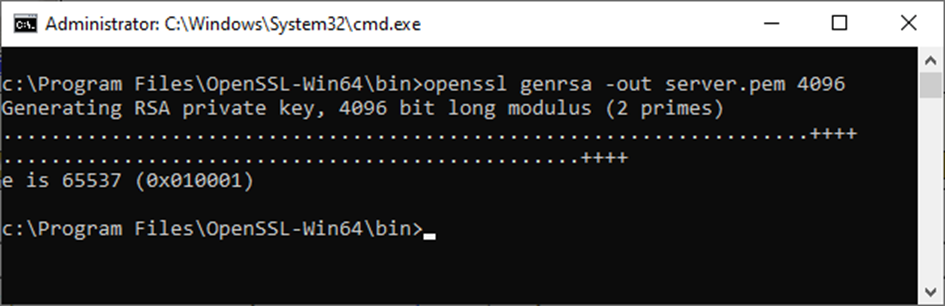
To create a 4096-bit RSA private/public key pair and store it in the server.pem file, we use the command
openssl genrsa -out server.pem 4096
The openssl utility is available by default on Linux systems. On a Windows platform, I installed Win32/Win64 OpenSSL.
Only the D2000 Kernel should have access to the private key (and its disclosure would compromise the security of the communication).
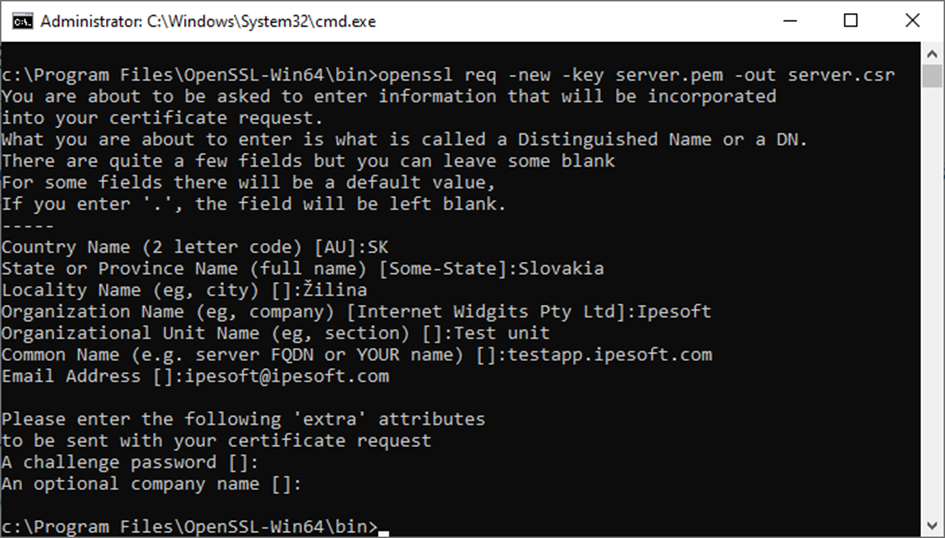
Subsequently, it is necessary to generate a so-called CSR file (Certificate Signing Request) - this is a request for the public key to be signed by an authority. We will use the command
openssl req -new -key server.pem -out server.csr
It is necessary to enter several data - country code, locality, name of the organization and unit, the so-called Common Name (in the case of HTTPS communication it must be the same as the name of the server, in our case it is not necessary) and e-mail address.
If the certificate will be signed by an official authority or a dedicated employee of the company responsible for the use of certificates, it is possible that additional, stricter requirements will be imposed on individual data.
The generated server.csr file must either be sent to an authority for signing, or you can sign it yourself. When signing, the -days parameter specifies the validity of the certificate (in days). Before the validity expires, the certificate will have to be signed again, or a new key and certificate must be generated!
Signing and thus creating a certificate that is untrusted (but that doesn't matter, D2000 clients accept it) is possible with the command:
openssl x509 -req -days 3650 -in server.csr -signkey server.pem -out server.crt
A server.crt file is created, which is a signed certificate. In the above case, I set the validity of the certificate to 3650 days, that is, almost 10 years.
Deploying a private key and certificate to the D2000 Kernel
The generated private key (server.pem) and certificate (server.crt) must be copied to the computer where the D2000 Kernel is running. Where? For example, to the application directory. There is already a config directory in it, you can create a tls subdirectory in it and copy both files there.
A security note - the server.pem private key should not fall into the wrong hands. Therefore, we recommend setting access to this file only for the SYSTEM user (or for another user under which the D2000 Kernel is running). The d2000 user is used by default on the Linux platform.
In redundant systems, you have two options. Either you use the same key/certificate for all servers, or you can generate two pairs (or more for multi-server redundancies). We recommend the first option - it's less work :)
Subsequently, it is necessary to create the keys TLS_KeyFile and TLS_CertFile in the registry in the branch
HKEY_LOCAL_MACHINE\SOFTWARE\Ipesoft<installation>\cfg_<application>\TLS_Server
and specify the location of the private key and certificate in them.

The last key in the same branch is TLS_RequiredLevel. This key should already exist and have a default value of None. This means that the D2000 Kernel does not require communication encryption and accepts clients that connect without TLS encryption. If we change the value to TLSNoPeerAuth, only clients with TLS encryption will be connected. In order to do so, it is necessary to configure the clients beforehand - otherwise they will not be able to connect.
Configuration of D2000 clients
First, we need to copy the server certificate to the clients (or certificates if we have generated a private key/certificate for each server separately for redundant systems).
Copying can be done manually. By default, we use the D2Update utility to update client installations. In practice it works so that when running binaries (e.g. HI), clients activate an update mechanism that connects to the update server (originally via FTP, but the more secure SFTP protocol has been supported and preferred for some time now). Available updates are downloaded from the update server, and then the program itself is started at the client, e.g. HI.
The result should be the same - there will be a server certificate somewhere on the disk. We recommend that it be placed in the application directory.
Subsequently, similarly to the server, it is necessary to set the TLS_TrustedCerts key to the name of the certificate file (including the path) using the registry entries (this time in the TLS_Client branch). In the figure below, you can notice that it is allowed to use symbolic Windows environment variables such as %AppData%. If you use dedicated certificates for each server in redundancy, you can also enter multiple file names separated by semicolons in this key.
The TLS_RequiredLevel key must be changed from None to TLSPeerAuth. This means that the D2000 client will only communicate with the D2000 Server whose certificate matches the certificate configured in the TLS_TrustedCerts key. For your interest - if you set the TLSNoPeerAuth value, the client will require an encrypted connection, but it doesn't care what certificate the server uses. However, this configuration is potentially exploitable for the so-called man-in-the-middle attack (and is the reason why publicly available servers use certificates signed by recognized authorities to prove their identity).

The last setting on the D2000 client side is the addition of the /C<application> parameter for started processes. This is possible either by editing the executable links or by setting the DefaultApplication key in the installation branch (in our example Computer\HKEY_LOCAL_MACHINE\SOFTWARE\Ipesoft\D2EXE_COV_PB) to the value <application> (in our example COV_PB). This parameter will allow D2000 clients to load the TLS security configuration from the registers specific to the running application, even before the client connects to the D2000 Server.
When using the D2Update utility, we have the option to run a script when updating the client, which can contain e.g. also setting registry keys. For your interest, we also attach this one - it is a simple 3-line script setting the described key registers. The last key has a doubled percentage value (this is necessary so that the symbolic variable is not interpreted when the script is run).

Functionality verification
Since setting the TLS_RequiredLevel parameter on the D2000 Kernel side to TLSNoPeerAuth, the D2000 Kernel will no longer be willing to accept clients without TLS encryption. When connecting clients with encryption, the D2000 Kernel log will contain lines like:
BACKEND - RegistrateProces request from MyComp.HIP V22.00.074 s380 [TCP/IP 172.16.0.2:59921][TLSv1.3]. ClientName: MyComp.HIP
The encryption used (TLSv1.3) can be seen in the log.
On the client side, there will be a message in the log about connecting using encryption to a verified server (TLSv1.3 VERIFIED):
CLIENT - Connection established to D2000 Kernel V22.00.074 s380 [TCP/IP 192.168.130.97:3119][TLSv1.3 VERIFIED].
Key and certificate replacement
Replacing the private key/certificate may be related to the company's security policy settings and must be done before the certificate expires.
Replacing the key and certificate must first be done on the D2000 Kernel side, and then distribute the certificate to clients. Existing connections will still use the old certificate, new ones will already work with the new one.
Conclusion
Setting up TLS encryption of communication between the D2000 Server and clients is a relatively easy and at the same time useful security-enhancing operation that will please not only administrators, but also auditors who will deal with your application. A nice feature of the Ipesoft D2000 real-time application server is the possibility of reconfiguration and possibly replacement of the key and certificate while the server is running, without the need for a restart.
October 7, 2022, Ing. Peter Humaj, www.ipesoft.com
